Sunday, April 22, 2012

Blast from the past - Empire Noble


Taking inspiration from many other wargame blogs in the veins of throwback Monday's, flashback Fridays and the such. I have decided to have a segment in our blog simply named "blast from the past" how original I know.... But it gets to the point and I can't think think of flashy names do this will do for now. Any suggestions is welcome!
This model was painted at least 7yrs ago. (can't remember clearly) that's why I make it a point to put the date I the year under all models I complete these days so I can look back and find out when I painted what.
It was a submission for a local painting competition at the now defunct "COMICS-MART" store.
I painted him in my then Empire collection of Stirland color scheme of greens and yellows. It was also my first foray into attempting non-metallic metal technique. As seen in the gold and silver attempted here.
I remember winning silver for the individual Warhammer entry. And got to choose a free blister pack. Which I chose the kislivite ice queen model! I have to get around painting that sometime soon.
Here's to more models from yesteryear!

DIY generic gaming board


I am in the process of making more terrain for more games at my place. And I already have two tables. However one of them is just the green GW battle mat and the other is a custom made hard foam modular tiles which is a black base. Making it perfect for fights on Chaos infested planets and urban settings. There are days when our group will want to play just Flames of War or Warhammer fantasy and the black board is slightly out of place as I only have 40k terrain to match it.

So I went to poke around the wood workshop in my school to look for unwanted plywood and I got the technician to cut it into 3 pieces of 2" x 4". Although the boards look a little thin it is very strong and most importantly space saving for storage in my small apartment. As long as no one leans his entire bodyweight on it it should not break!
 I went to my local home fix store and picked up a tub of Wall Putty for $2 Singapore dollars. This would be the main agent to create some irregular basing for what would otherwise be a boring flat space. 
I added a little random ballast while applying the wall putty for instant added texture.
 I did not want to fill the entire board with the texture as it would first be extremely labor intensive, increase in cost as I would have probably needed 10 tubs of putty. And most importantly it would weigh down the boards so much that it would defeat the purpose of having a lightweight and space efficient motive.
 Here are the boards let out to dry outside my apartment.
The next day (do let it cure 24 hrs for maximum hardness) I picked up some cheap acrylic paints from my Art store. I wanted to achieve a scorched brown color so I used Burnt umber mixed with a little burnt sienna. 

Once all the base color was dry I use GW Dwarf Flesh (dried out old bolter design screw top bottle, which coincidentally looks like the new dry paints haha) to dry brush the textured areas. Followed by a lighter dry brush of Vallejo Model Color Pale Flesh.
 Next step was to use the Dwarf flesh again and lightly go over all the flat areas brushing in a circular motion to just create a little uneven look. Then the easy part was to add Woodlands Scenic Green & Dark Green Static grass mixed together.

Here is the boards all ready for games of Warhammer Fantasy, 40K and even Flames of War!

Some Guardsmen eager to lay feet onto virgin soil.

I had a great time making these boards. Although it would have been easy to simply drop a few notes and purchase one. Making your own terrain is a rewarding experience.

FoW game on Sunday


Had 2 games on Sunday with my freshly painted Russian Heavy Assault Gun list. I faced an SS German tank company and an American tank company. Lost the game against the Germans but managed to snatch an objective quickly by turn 4 to win the game against the Americans.

I did not prepare to write a battle report so here are just some pictures of the day.

Finished up my Nuln Empire Handgunners


Majority of the paint job was done late last year in September. However there were many small details such as the pouches and bits here and there incomplete. So I went ahead to pick out all the remaining stuff and also took the opportunity to finally do up the Banner.
Althoughthe banner is a simple scheme with the typical weighing scale I think it fits the Black & White color scheme I'm using for my Nuln Army.
I also decided on the basing for the army and added grey stones to have that added dimension and to make it look more realistic (hopefully). Also many thanks to Dave Taylor for the help in the base color scheme! I just couldn't get the color right so the advice was greatly appreciated.

24 Tanks in 24 hours


First let me apologize for the title. It just sounds like a cool headline. Nonetheless, it's not as misleading as it seems actually.

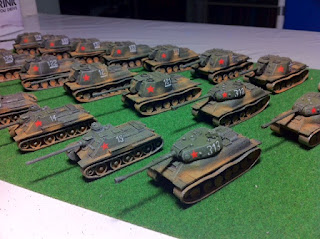
I managed to paint up all 22 of the Gaming Models Tanks that I received yesterday. Not in 24 hours per se, but in about 9 hours.

Yes the models came fully assembled and primed black. That saved me a huge amount of hobby time. Probably at least 4 hrs or more I reckon. However I went ahead with my standard method of painting according to the rest of my other tank models. And boy was it a tedious challenge!

The models went through a few simple steps (multiply everything by 22 here and it becomes not so simple anymore hah!).

Firstly an airbrush of light grey to provide the "zenithal" base color. Then another airbrush coat of Russian green. The zenithal method has already provided all the important shading at this stage. Then I washed the entire model in Vallejo Black Wash. This was to give all the crevices its required dark shading and to bring the Russian Green down one notch. As all the pictures I see online of real Russian tanks to be a tad darker than the color scheme suggested by Flames of War.

After the wash was dry I went over the entire armor areas with a light dry brush of GW Dheneb Stone. And the tracks were also dry brushed with GW BoltGun Metal.

The next step is the most arduous of all. The painting of the red Soviet Stars and tank number markings. This took almost more than half the total time spent painting up the entire model. But well worth it as it adds to the overall look and makes it much more realistic and complete.

Final stage is to use chalks to weather it with the mud stains. ( it looks bright in the pictures but once I hit it with a coat of dull coat tomorrow it will tone it down alot). I'm too tired now to dull coat it. I have been painting for almost 6 hours straight and I'm totally smashed.

I hope my efforts will change the perception of Gaming Models in general. They are really nice models once a decent paint job is applied to them. And like I mentioned in my previous post, the photos on their site is really not a positive representation of the models at all.

Enjoy the fruits of my labor.


p.s drop yourself a challenge once in awhile. It's worth it.

Quick Review: Gaming Models Heavy Assault Tanks


I recently made an order from Gaming Models. It's a one man operation doing 15mm tanks for WW2. The main feature of his models are that they are an extremely cheap alternative to Battlefront's very expensive Flames of War models. And best part is that they come painted (albeit a very basic paint job, just one base color and a quick dry brush) these are great for those with no time to paint or simply just not wanting to paint!

I ordered mine unpainted (same price though!) with only a black undercoat. This was tremendously helpful as it cut down time needed to clean up the models and undercoat them. Once I received the models I went straight to my airbrush and provided them with a coat of Vallejo Model Air Russian Green. This was to ensure the colors match up to my existing tanks. Imagine those that ordered them painted. Simply opening up the parcel and plonking them onto the table ready to play sure is an exciting prospect!

And all these for an extremely low price of $5USD per tank. This works out to about $6.20 Singapore Dollars. They also have an offer where you purchase 10 tanks and they will throw in one more for free. Effectively making is $4.50USD for each tank. Considering a Flames of War tank costing average $7GBP ($14SGD) this makes it more than half as cheap! And once again I cannot emphasize enough the joy of not having to clean up and assembling the models. Its a luxury I tell you!

However with the price you should not be expecting Battlefront quality. This being said I must put into context that in no way am I suggesting that the model is inferior. In fact I honestly feel that it is detailed enough and look great once you apply a decent paint job. Take a look at the pics below and judge for yourself. If you ask me. I would say these models are roughly about 60-70% compared directly to battlefront products. (Assuming we take battlefront as a 100% benchmark)

p.s if you visit the gaming models web-store you will find that the blurry pictures do the models no justice. Which I feel is a terrible pity as it would definitely have turned a lot of potential customers away.

Here is an SU-100 tank next to a Plastic Solider Company T-34
Here are L-R, SU-152, ISU-152 and ISU-122 all from Gaming Models
Can you believe I paid $100 Singapore dollars for all 22 of these tanks? A box of five ISU-152's from battlefront would set me back $74 Singapore dollars!!!!! And that's only for 5 tanks!
Straight outta the box and the airbrush attacks them!

Completed Furioso Dreadnought


I'm surprised how quick it took to paint up this dreadnought. Well I guess it's the airbrush work on the armor that tremendously cut down the painting time.
All I really had to do after applying the red by airbrush using the Zenithal "top down" approach of shading and highlighting was to simply go in and pick out the details. The armor was really just 2 quick layers of highlight as most of the shading and highlighting work has already been settled by the airbrush.
Here is the pic of him in all his chesty winged glory. Enjoy.
I guess with all the new Empire releases this April I should be in the mood to paint up some of my Nuln Empire. After all like I always advocate - Paint whatever you have the mood for and the paint job will flow nice and quick. Any painted mini is better than no painted mini so don't be so hard on yourself! It's supposed to be fun!

WIP furioso dread


Moving away from painting 15mm miniatures and back into some 40k blood angels.
He's been sitting on my shelves for long enough. Time for some paint.

Completed Terrain: Rural village table


I've never really put my heart into making so much terrain throughout my hobby life, but since my foray into Flames of War this year I guess my perspective has changed a lot towards realistic and great looking terrain. Somehow making futuristic "gothic buildings" and "magical structures" adorned with a million skulls never gripped me as much as "real" scenics.

Being in 15mm scaled also meant that majority of terrain where reduced by half in size to my usual 28-32mm Games Workshop exploits. This meant that the same 6' x 4' table would have to be properly (and densely!) filled to look good.

I have had much experience making terrain but like I mentioned never really putting in enough commitment to produce anything substantial (usually just the odd building or hill). But this time around I managed to channel all my energy into creating a full on Flames of War table to play my games at home (maybe also due to the fact I am finally living in my own house now).

I won't go into detail of how I made all the terrain. Maybe I'll post them up into simple tutorials when I get the chance (I already took pictures of most steps so that will come in handy). Everything on the table is DIY made by me expect for the buildings which are from PaperTerrain.com. I still had to spend hours cutting and putting them together though.

Enjoy the pictures and let me know what you think.


Product review: Citadel Devlan Mud Vs. Vallejo Wash Umber Shade


The magic wash. The revolution. The lifesaver. The cheater. There are many names we hear them being called. When Games Workshop put their range of washes out it basically changed the way 28mm Games Workshop 'Hobbyists' life forever. Funny though as washes have been part of miniature painting since god knows when. I guess most GW fanboys/purist are indeed in their own bubble. And I must admit I fell into the aforementioned categories once upon a time.....

Enough of my rant and on to the juice of this article. Like I mentioned my painting and hobby has progressed a lot since my fanboy days and I have expanded my hobby way beyond the offerings of GW. In fact, with the damning GW EMBARGO imposed since JUNE 2011, I have had no choice but to look at alternatives to my painting needs. Refusing to pay ridiculous local retail prices I not only moved away from GW supplies but away from anything GW unfortunately.

Here I have recently acquired a bottle of Vallejo Wash Umber shade. I have also bought the black shade and sepia shade to try out. But in this article I shall focus on Umber shade as it's the closest to our beloved GW Devlan Mud wash.
Here I have tested it on my Flames of War Soviet Tank riders. The one on the furthest right is GW Devlan Mud. And the other two on the left is Vallejo Umber Shade.
Here's a back view. Devlan Mud on the left. And Umber shade on the 2 miniatures to the right.

So what's my verdict? Devlan mud is slightly darker however the difference is minimal. I never use my washes straight out of the pot as it is always too thick and dark. I always add a small drop of water to thin it down a little, and I have done this on both washes in the examples I've shown here. Basically I feel that the Vallejo Washes behave very similarly to the GW ones. With the only exception that they dry REALLY MATT. It's like you sprayed your entire mini with a thick coat of dull coat. Nothing really wrong with this for me as washes are normally a first stage for my painting so there will definitely be more layers of paint going on them and the effect won't be noticeable when your miniature is completed. However if washing a miniature is the final step of painting (I know many who use washes as a final step) then maybe you need to take note of this.

Price is a no-brainer for these as vallejo paints are always so much cheaper than GW ones. So that's a plus point.

Overall I am happy with the results and can safely say that once my current pot of Devlan Mud runs out I will be switching over to Vallejo's washes for my painting needs.

Hobby: Dollar Store Train Tracks for Flames of War


Train tracks are always a nice feature on gaming tables and with my current impetus towards FoW I have been very eager to have enough terrain to be able to play my own FoW games at home. This post is about how a visit to the dollar store, which happens to be called DAISO in Singapore. And each item actually costs $2 singapore dollars. I visit the store often to get my stationary supplies, small storage items and of course, terrain and modeling needs.


So while walking through the toy section I came across this nicely detailed train tracks, yes I know they are highly modern electric tracks. However I thought that with a little strategic modeling and a nice coat of paint I could pass it off as train tracks used in WW2. After all the main structure of the rails have remained the same. So I picked up a couple of packets ($6sgd worth) and brought it home to 'fix it'.
This is the pic of the packaging (for those who has a Daiso in their country or am looking for a reference to what I bought), I bought a cross section but decided not to use it. Maybe I'll revive it sometime later, for now its gonna be in cold storage.
Here are the tracks all laid out and ready for priming. I primed them black and got to work, I simply dry brushed the whole thing with GW Bestial Brown. And painted the metal tracks individually with GW Boltgun metal. I know its a tedious task, but it did help to achieve the professional look I wanted to get out of these cheap toys.
All nice and painted and ready for the next step. Flocking.
I used Woodlands Scenics Medium Green Static Grass and flocked the sides of the tracks.
Yay a simple task but adds a whole dimension of realism to it!

Next few shots will be them on the table with my Soviet army rumbling all over them.


All in all it took me about 3 hours and $6sgd for eight 8" straight sections and four 6" curved sections. More than enough to cover the entire length of a 6x4 table!