Monday, January 6, 2014

WIP White Necrons. Airbrushed, Assembled & Magnetized.

I have been slow with my Necron progress due to work priorities (yeah the usual excuse....) but have picked up the pace with the recent School Holidays. I made the first step and fixed up all the Necron miniatures I bought. And decided to prime them and give them the base color of white all at one shot. It took me an entire day but it was worth it as it meant 50% of the army was technically painted. 
The first model I approached was the Monolith. This model in particular has a special place in my heart as it was the first model I built and painted when I first worked at Games Workshop many years ago. I was tasked to do up a monolith model and here I am almost 10 years on, fixing and painting up my very own Monolith for my own Necron army! 

I went for an exaggerated fade to black color for it as the huge model provided the perfect opportunity to do so. I used cardboard mailers as the masking tool and went to work!
Then I magnetized the Ghost Ark. (This model was one of the 2nd hand models I bought thus the funky paint job). I ditched the attachment via the sides into the middle of the platform and went straight onto the centre back instead.
Here you can see the magnets on the back of the Warriors.
 Everything in myArmy thus far. Assembled and Primed black.
Then I batch Airbrushed everything. Just a very basic Zenithal style of painting. 
Even the Bases where airbrushed to save valuable time.
 I decided to go with an end autumn/early winter look. I always wanted to have an army with ice bases. Biggest problem I had was that my models are predominantly white. And if I had too white a base the model would camouflage itself too nicely into the bases. While it was cool to have a good camouflage going on it was not good visually for models. 

Ideally we would want a dark base for bright miniatures and vice versa. But I wanted to achieve something in-between, so I did some research and found out that by applying just minimal snow effects on the bases it would still convey that cold icy feeling without detracting too much from the miniature itself. 
Here are the first 10 Warriors along with 10 Scarab bases only. As amidst all the frenzy of fixing and priming and airbrushing I left out the Scarab models completely! Opps..... 
My aim is too complete the army by the end of April. A huge task and challenge, but I'll try. Will need alot of motivation and encouragement to stick to my goal!

WIP: Necron Tomb Blades & Magnets


After painting up my first wave of Necron Warriors I had been booged down with work and just couldn't make time for the hobby. However with the much anticipated March School term break I made  myself fix up the many Necrons I bought for this years 40k painting project. Other than these boxes here I already have 40 warriors, a ghost ark and a unit of Destroyers.
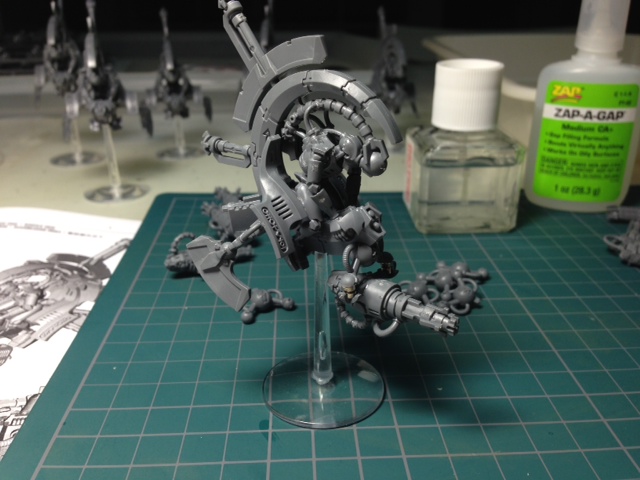
I decided to built up the Tomb Blades first as I really like the models and they looked fairly simple and uncomplicated (boy was I dead wrong). 
Started with the main structure and all was relatively straight forward, then I got to the part where causes the most problems for me. Wargear. You see I'm not much of a gamer, I collect and paint up my models 90% of the time. With the remaining 10% or less on actual gaming. But I like to build up my armies "game legal". So WYSIWYG is very important to me, as well as choosing the correct wargear to arm the miniatures with. I don't want a unit I painstakingly painted up to be totally useless in the game (should I ever get around playing with them). 
Then the nightmare begins, it's been quite awhile since I touched GW models, and I was rudely reminded that GW kits are so detailed that it would require millions of parts for a model. Even the most basic exhaust pipe came in two parts! Guess I've been pampered by Flames of War and Dust warfare the past year or so that suddenly multi-part kits seem so daunting! Little did I expect to spend the entire afternoon just putting these guys together, gosh.....
Well after putting together 55475869 pieces of plastic together to finally form the miniature I went on with thinking about how to magnetize the guns for the Tomb Blades. As the joints were not slot in or simple snap ons I had to do a little cutting to make the magnets fit. Fortunately this was not too difficult.
All the weapons with the magnets nicely slotted in.
Weapons easily swapped out yay!
Now on to my next kit, the Wraiths. Hope it will be easier.......


Total War, 9 Players massive game!

The Flames of War Community (albeit very very small one) came together to play a Total-War game for the departure of one of our players Raj, who will be leaving for New Zealand for a change of environment. We wish him all the best in his endeavors and don't forget to buy more Flames of War stuff as New Zealand is the home of FOW!

Each side had 4 forces amounting to 2000pts each roughly. I did not keep track of the battle as it was huge and I was busy playing it. But here are some pictures of the throwdown that happened that day.

And oh, the Allies won.


The 2013 Necron project. The White Elephants Tutorial.

It's the Beef again with another one of my "New Projects" and I've decided to embark on a 40K project this time around! Yes it's gonna be Necrons! And I have named them the White Elephants!

Why Elephants? Well ever since the Necrons first proper (full range with Codex) army appeared almost  10+ years ago I've always been captured by the then Hulking Monolith Model. It was definitely one of the largest back then. Although these days almost every army has a large model or three.... Nonetheless, it always felt like an elephant to me. Large, hulking, slow, you get the idea..... Also I remembered having a blast painting the Monlith model for the store display when I was working in GW back in my younger days, ah those beautiful memories.....

So here I am desperately trying to get back into 6th Edition 40k gaming and with it I needed a new army! (An excuse I know, who else isn't guilty of this?) What made it even sweeter was that just a few days after I decided to buy a Necron army the local retailer for GW products decides to hold a Warehouse clearance sale. Well and the rest like they said, is history.

I decided to approach this army really quick. I have to a good extent gained enough control of my Airbrush to enable me to lay down huge amounts of Basecoating + Shading + Highlighting to good effect. And I wanted to fully exploit this approach.

Not wanting to do a typical Silver/Boltgun Metal Army I went for the Ceramite look. Therefore White would be my main color.

I also wanted to add a more complete effect as White is not exactly a color to highlight so I went with the Tank and WW2 painting method of weathering armor. This was a quick method to add character and detail all at once to the models without being overtly time consuming.


This was the first 2 steps. Over an undercoat of Black, I applied Vallejo Model Air White using the Zenithal method (spraying from the top all around 45degree angle). This left all the recesses and underneath of the model black. Effectively creating a shade all at once.

Next I carefully painted the socket and joints with Army Painter Dark Tone (this is essentially black wash, and exactly similar to the previous Citadel Black Wash). Shoulders, Elbows, and Knees, nothing else. Like I said the other dark lines in the model had already been created after the first step of Airbrushing.

Yes these models you see here had nothing else done to them except one layer of white Airbrushing and a Black Wash! Amazing how quick it can be!

Next I used the tried and tested way of using a sponge to apply the weathered effects. I used Vallejo Model Color German Grey as this was very close to black yet has a dirty metallic look to it. Complemented the with perfectly without creating too stark a contrast!


The next step was to apply Vallejo Game Color Scorpion Green through the Airbrush onto the Eyes, Chest and Gun area to create the infamous "Glow" we see all too often with Necrons.

The glow really helps with adding another layer of detail to the army, with such a limited palette the green almost becomes the secondary color, yet it is not!

I stuck to the green rods and decided not to airbrush them as the objective was to get the army done up quick. Most of the newer Necron models don't come with the green rods so thats another set of time consuming element that I cannot avoid, therefore those that I can, I shall.

Here the stand 90% completed. But definitely Tabletop Standard and Game friendly.
What's left are the final highlights to the green Glow effects, but I'll come back to them at a later date!

I completed these 10 warriors in 2 seatings, amounting to about 4 hours. Minus the assembling and black undercoat of course. But I'm happy with the final results and the speed the army is able to be painted up.

I'm targeting a completely painted 2000pts Necron army by the end of March. That's about a month. And I honestly think I can do it, assuming I don't get distracted (which I reckon I probaly will).


Painted up "Joe" from Hasslefree Miniatures


Recently I have been busy working away at my FOW Soviet Infantry minis and got a little bored. While surfing the net looking at kickstarters (I'm officially addicted to kickstarters btw) I came across this painting tutorial by James Wappel. I watched his sample video and was so impressed with his very unorthodox way of painting that I thought would be cool to try out myself.

Be sure to check out his kickstarter should you need painting guides or just want to bring your painting to a higher level.

He paints his minis like I would normally do on a canvas mixing all sorts of colors together just to get the tint and shade etc. Looks like alot of fun, and I was pretty confident I could pull it off.

So I looked through my miniature stash and came across my untouched "Zombie Apocalypse" models and decided to try it on "Joe" from Hasslefree Miniatures.

If you watch his video you will realize he mixes lots of colors and I personally feel while it may be good for painting single models, I really dread the idea of painting up a horde of minis mixing and estimating throughout my paint session.

However I picked up many painting tips and applied them to "Joe".

I started with a black basecoat and a light misting of grey from the top ( another great painting tip I picked up from other pro painters). Then worked on the skin with Vallejo Khaki Grey. From there I lightened the color with GW Dheneb stone and Ultramarine Blue. Sounds strange but that's the way to just mix the colors it still looked good.

Unfortunately I got so carried away painting that I randomly picked colors off my shelf and started blending and mixing them till I lost track. And the next picture I took was it completed. Opps.....
The resin city base was from Fenris Games. They produce very nice resin bases and lots of terrain options. Best part is that they are very competitively priced. I would recommend them anytime. Other manufacturers have resin bases going at average 1 British Pound each. That equates to $2 Singapore dollars a base, and I've not included shipping costs yet. 

These bases from Fenris were only 5 British pounds for 12 bases! You can do the math! Their shipping is also cheap to boot!
 

This is definitely a nice diversion from the usual "factory line" painting that we are all so used to and guilty of. Hopefully it will be enough to make me start painting up my "Zombie Apocalypse" range of models soon!

WIP: Soviet Infantry and more captured halftracks

Building up the remaining 2 halftracks from the excellent Plastic Soldier Company range to flesh it out to a full squad. This will allow me to take the Razvedki Platoon in my Tank Companies.


Also I'm back at work to finally finish up the hordes of infantry stands so that I can finally try out an infantry lists.

P.S just in case you were wondering. I make it a point to only play with painted miniatures. This not only gives me the added motivation but also makes me think very carefully before purchasing models for my army.

Although I can't say it has always worked. I have many a unit that I felt didn't work out and I did not want to use then anymore/much.

But guess what, at least it's already painted!!!

Imagine the motivation to paint up a unit you know you won't use or like. It's gonna be almost zero and will probably never get painted if not for my self imposed policy!!!

FOW quick AAR: Soviet Forward Detachment Mech Company VS German Volksgrenedier

Got back into a gaming mood after a long dry season which always happens towards the year end holidays!

Last weekend Tim Miller came over to my place for a game of FOW. I was still tweaking my Forward detachment list as the Soviets have been seriously hit by lots of special rules and the such in Version 3.

Tim on the other hand brought along the latest Volksgrenadier list from the latest released Nuts: Bastogne book. And is looking set to spam cheap "reluctant trained" germans with their panzerschreck & panzerfausts! Not very good for my Tank heavy list.....

Here we see the big man looking up on our mission. We rolled the random mission generator and came up with "Hold the Line" which was played along the long table edge. Being a Mech company I am always the attacker so I had to wait while the Germans chose the table edge to defend and deploy. It's a long way to the end of the table for the objectives and the Germans are all nicely dug in. It was gonna be hard to root them out and get the objectives. 

I had to get any objective before turn 6 to win the game. The Germans had to hold or contest to bag it.

Naturally the Germans capitalized on this and chose the end with the dense town. Lots of buildings for concealment and ambush. Lots of hedges and obstacles to hinder my movement.
Our terrain setup for the battle. A really tightly packed table. The germans deployed on the bottom half of the table.


 Despite pulling up a large platoon of T-34s with my decoy Panthers unit. I was unable to get any shots due to the Germans being comfortably dug in and gone to ground.

I moved up along the road but was quickly halted by the Anti-Tank Guns. One lucky turn saw all four of my Heavy IS-2 tanks go down in flames......

This led to a large platoon of German infantry being stuck in the houses with very little targets for the rest of the game. But I guess they already served their role well in taking down my heavy tanks.

With the company HQ and almost 15 stands of infantry holding the objective. I was not going to be able to root them out. And once the Germans dig in and hold the objective it's gonna take a lot to clear them out.

I had to rely on my T-34s to rush down the relatively unprotected right flank and try to get the objective quick to seal the game.

Tim was really unlucky that upon reserve roll none of his units arrived to lend the much needed reinforcements as my T-34s looked poised to steamroll their way towards the objective. 

However Tim was lucky enough that my T-34s failed to destroy his small Stug unit tasked to defend that objective. Once again Tim failed his desperately needed reserve roll the second time on turn 5!!!

I was almost certain of victory as no reserves meant that his 2 remaining Stugs could not have withstood the advance of my T-34s. But alas my tanks all bogged down during that vital assault toward the objective, which meant that Tim would definitely get his reserve reinforcements on turn 6.

My infantry were too far behind to do anything. And with reinforcement arriving along the German edge would mean fresh German units contesting the only objective I could possibly take. We ended the game as it was a certain German victory as they held firmly onto both objectives.

I was so close! Darn those tank mechanics, if only they had done their job better!